


" height="21.95706114703747px" id="qM5sFNDIS" transform="translate(3.459 1.023)" width="17.081538493872166px"/></svg>)
" height="16.041644077985946px" id="vPwWmgEb7" transform="translate(2.375 4.207)" width="19.249983003077222px"/></svg>)
" width="20px"><path d="M 0 20 L 0 0 L 20 0 L 20 20 Z" fill="transparent" height="20px" id="Iu2kCeaUT" width="20px"/><path d="M 4.531 6.206 L 0.253 6.206 L 0.253 19.08 L 4.531 19.08 Z M 2.393 4.449 C 3.884 4.449 4.813 3.46 4.813 2.224 C 4.785 0.961 3.884 0 2.421 0 C 0.957 0 0 0.961 0 2.224 C 0 3.46 0.929 4.449 2.364 4.449 Z M 11.178 19.08 L 11.178 11.89 C 11.178 11.506 11.206 11.121 11.319 10.847 C 11.628 10.077 12.333 9.281 13.515 9.281 C 15.063 9.281 15.682 10.462 15.682 12.193 L 15.682 19.08 L 19.961 19.08 L 19.961 11.698 C 19.961 7.744 17.85 5.904 15.034 5.904 C 12.765 5.904 11.747 7.152 11.178 8.029 L 11.178 6.206 L 6.899 6.206 C 6.956 7.414 6.899 19.08 6.899 19.08 Z" fill="rgb(0, 0, 0)" height="19.079659942779543px" id="hzLTqQuQE" transform="translate(0.02 0.461)" width="19.960870207061767px"/></g></svg>)
" height="18px" id="TrPl6m2Z8" transform="translate(1.75 3)" width="20.5px"/></svg>)
Key Takeaways (TL;DR):
Follow a timed 30-minute testing sequence that covers URL verification, mobile layout checks, functional form testing, and analytics validation.
Prioritize the 'click-to-conversion' flow by aligning user attention and trust while removing technical friction like slow load times or complex forms.
Utilize a scale-appropriate priority matrix to focus on offer clarity for low traffic and robust infrastructure for high traffic.
Implement an 8-point checklist to catch common 'silent' failures such as broken payment webhooks, mismatched CTA promises, and unoptimized mobile images.
Ensure attribution integrity by preserving UTM parameters and using first-party identifiers to track which social posts drive sales.
Run a 30-minute testing runbook for the click-to-conversion flow
If you're aiming to finish a link in bio quick setup and start collecting sales or leads within the hour, you need a compact, repeatable testing runbook. The goal is to validate every step a real visitor takes from the bio link tap to a completed conversion (email capture or payment). A runbook reduces cognitive load and prevents “fix one thing, break another” loops.
Here is a practical 30-minute sequence to follow. Time-box each step and use a stopwatch. Use your phone and a desktop browser to cover the main interaction surfaces. Do not rely on preview modes alone—open the published URL in an incognito window and from a second device that simulates a follower’s environment (older iPhone, low-bandwidth Android, etc.).
Minute 0–3: Verify published URL. Paste the bio URL into incognito on mobile and desktop. Confirm it resolves over HTTPS and doesn’t show an error or redirect loop.
Minute 3–8: Visual and mobile layout check. Scroll through the page on a phone. Look for clipped buttons, off-screen CTAs, or stacked form fields that push the first CTA below the fold.
Minute 8–15: Functional checks. Submit the lead capture form with a descriptive test email (e.g., test+ig123@example.com). Attempt a test purchase if a payment option exists; use test-card mode if available.
Minute 15–20: Analytics verification. Trigger events (page view, form submit, purchase) and verify they appear in your analytics or attribution dashboard. If events don’t appear, check tag loading order and network requests.
Minute 20–25: Link destinations and third-party integrations. Open every outbound link in a new tab and confirm UTM parameters, payment redirect, or download deliver the intended content.
Minute 25–30: Stress moment and publishing. Simulate a common edge case: slow network, ad-blocker on, or cookie disabled. Revisit critical CTAs to ensure they still work. If everything passes, publish and push the link into your bio.
Twenty to thirty minutes of focused validation will catch the majority of blocking errors that cost conversions. You cannot test every permutation in half an hour; you can, however, ensure the core conversion path works for the majority of your audience.
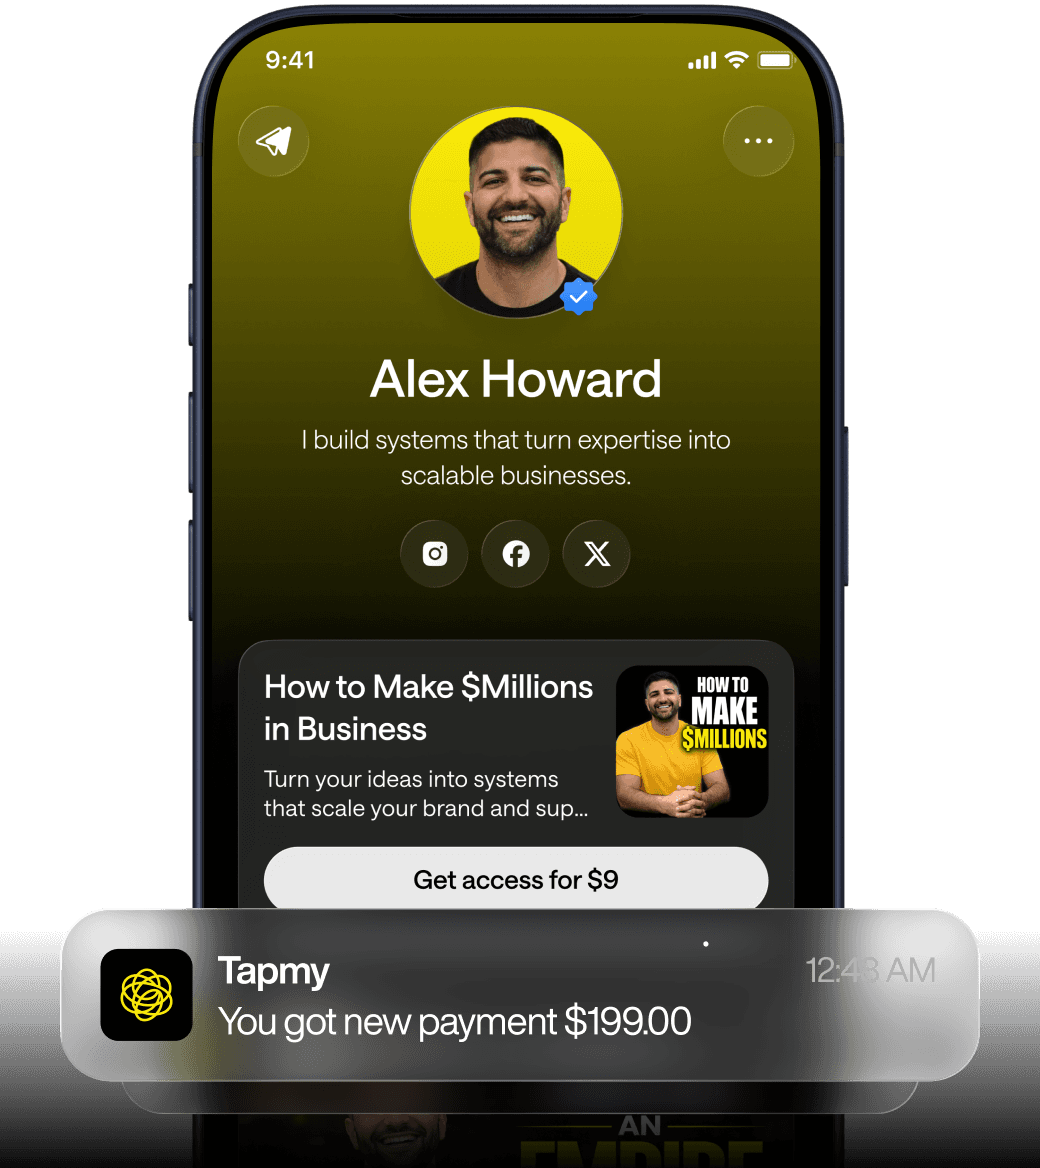
How the click-to-conversion flow actually works — technical and behavioral mechanics
At a systems level, the click-to-conversion flow is a short funnel where the page (link-in-bio) acts as the funnel entry point and gatekeeper. The technical mechanics are simple: a HTTP(S) request, rendering of HTML/CSS/JS, user interaction, and optional server-side actions (email capture, payment processing). But behaviorally, the page must align three things: attention, trust, and friction.
Attention is earned by copy and visual hierarchy. Trust is established by product clarity, social proof, and transparent payment flows. Friction is anything that slows or stops action: long forms, unexpected pop-ups, or slow load times. The interplay between these determines your conversion rate far more than any single visual tweak.
Technically, three subsystems matter for a creator doing a link in bio setup:
Client-side experience: page load speed, viewport layout, and mobile tap targets. These are visible to the user and influence whether they stay.
Integration layer: forms, payment endpoints, email delivery. Failures here create silent losses (you think signups happened; they didn’t).
Attribution and analytics: how clicks map to campaigns and downstream conversions. If attribution is broken, you cannot tell which posts or channels produce value.
Note: monetization layer = attribution + offers + funnel logic + repeat revenue. The link page is the funnel logic component; it must preserve attribution, present an offer that matches the channel, and feed repeat-revenue logic (email capture and payment records) back to your systems.
Why it behaves this way: modern mobile users have low tolerance for ambiguity. Short attention spans amplify the effect of even small technical delays. A one-second increase in server response often feels longer. And because creators typically drive traffic from short-form platforms, the expectation is immediate value—one tap should result in an obvious next step.
Eight-point conversion checklist: what to test and why
Practical checklists are useful only if they map to failure modes you will actually encounter. Below is an 8-point checklist tuned to quick setups: load speed, mobile view, CTA clarity, offer match, social proof, contact option, analytics active, and payment tested. Each item explains what to confirm, a common failure, and a quick remedy.
Checklist item | What to confirm | Typical failure | Quick remedy |
|---|---|---|---|
Load speed | Page renders primary CTA within 2–3 seconds on mobile | Large hero image delaying interactive content | Use compressed images or lazy-load below-fold assets |
Mobile view | Buttons are tappable; no horizontal scroll | Button overlaps with fixed header or is off-screen | Adjust CSS or select simpler layout template |
CTA clarity | CTA text matches final destination (e.g., "Download guide" → downloads) | CTA promises something else than the landing content | Rewrite CTA or change destination to match promise |
Offer match | Offer aligns with originating platform/creative | Audience expects free resource; sees paid product | Swap a free lead magnet as the primary action |
Social proof | Short, scannable proof near CTA (testimonial, count) | No visible proof; user hesitates | Insert one short testimonial or media mention |
Contact option | Easy way to report issues or ask questions (email or chat) | User abandons because of uncertainty and no contact path | Add a small contact link or reply-to address) |
Analytics active | Page view and conversion events register in analytics | No data recorded due to wrong tracking ID or CSP block | Verify network requests and correct tracking script |
Payment tested | Test purchase completes end-to-end (confirmation email sent) | Payment accepted but confirmation email fails | Check payment webhook and transactional email provider |
Run the checklist in order each time you change the page or push a new offer. If you follow the 30-minute runbook above, you should reach the analytics active and payment tested items within the same session.
Common failure modes — how they appear and why they happen
Failures fall into predictable patterns. They are not mysterious; they are usually emergent consequences of decisions taken to save time or simplify setup. Here are the most frequent ones and the root causes behind them.
What people try | What breaks | Why it breaks (root cause) |
|---|---|---|
Embed many widgets (chat, video, multiple forms) | Slow load, script conflicts, broken form submission | Third-party scripts compete for main thread and for network; race conditions |
Use non-matching CTA (e.g., “Shop” but links to email capture) | Higher bounce rate; lower conversion on intended action | User expectation mismatch; cognitive dissonance |
Skip analytics to save time | No visibility into which posts drive conversions | Blind optimization; arbitrary changes |
Use a complex checkout flow with many upsells | Abandoned carts, payment errors | Friction compounds; mobile typing errors; payment provider UX not optimized for one-off buys |
Rely on default image sizes | Images slow the page on mobile data plans | Defaults are rarely optimized for mobile-first creator pages |
Two points worth underlining. First: scripts are fragile together. Even if each widget works independently, combining them on a small, single-file page creates race conditions and layout shifts. Second: the smallest mismatch between CTA language and destination is disproportionately punished. Users expect immediate, predictable outcomes from a single tap; mismatches are interpreted as low credibility.
Priority matrix: what to build first vs what to iterate on later based on traffic level
Not all features deserve the first 30 minutes. Use traffic as the primary signal to prioritize work. If you have under 100 daily visitors, focus on clarity and offer match. If you have 1,000–10,000 daily visitors, prioritize analytics and payment robustness. If you have >10k, focus on load mitigation, fraud detection, and conversion rate optimization.
Traffic band | Immediate priorities (first 30–60 minutes) | Next iterations (days 1–14) | Low priority early |
|---|---|---|---|
Under 100/day | Clear primary CTA, mobile check, single lead magnet, simple contact link | Basic analytics, payment test, one testimonial | Multivariate testing, page personalization |
1k–10k/day | Robust analytics, payment webhooks, load checks, multiple matched CTAs | Retargeting pixels, A/B headline tests, optimized images | Full commerce catalog or complex checkout flows |
10k+/day | CDN, caching strategies, fraud/chargeback controls, backend scaling | Personalization, advanced funnel splits, subscription mechanics | Manual processes for customer service (automate first) |
This matrix helps you make defensible trade-offs in the first half hour. Builders often mistake "possible" for "necessary." When traffic is low, a polished, single-offer page converts better than an all-singing, all-dancing storefront that nobody sees.
Deploying and monitoring in the first 24 hours — realistic expectations and signals to watch
Rolling the link into your social bios is an action, not an end state. The first 24 hours are noisy: clicks will appear, some signups will arrive, and you’ll discover edge cases you didn’t simulate. Monitor five signals closely; they tell you whether the setup is healthy or needs immediate rollback.
Conversion rate on the primary CTA relative to expectations (not a fixed benchmark — compare to prior posts).
Drop-offs between page view and form submit (indicates friction at the page level).
Payment failures and chargebacks (early spikes often signal incorrect test mode or mismatched currencies).
Email deliverability for transactional messages (bounces, spam folder placement).
Qualitative feedback coming from DMs or contact addresses (look for repeated user confusion).
Set simple alerting: a daily digest of conversions and a real-time notification for failed payments. You do not need a full observability stack; a few focused alerts prevent most catastrophes. Expect noise. Some early customers will test limits (ask for refunds, try odd card types). Distinguish between systemic failures and typical launch churn.
One practical monitoring habit: keep a short incident log (just a single line per problem) during the first 24 hours. It helps you trace whether errors are persistent or transient. Also, maintain a single source of truth for your live link URL — a pinned note — so you don't paste the wrong version into different platforms.
Practical examples and fast fixes from real creator setups
I’ll describe three brief, representative cases drawn from direct experience with creators who needed a link in bio quick setup. Names omitted; patterns only.
Case A: The course launch that registered purchases but never sent access. The checkout accepted payments. But the webhook URL in the payment provider pointed to a staging address. Fix: update webhook to production, re-run a test charge in sandbox, and trigger access provisioning manually for customers who paid.
Case B: A free guide CTA that lost conversions. The CTA said "Get the guide" but the form requested full billing details because a commerce template was reused. Fix: swap to a lead-capture template, reduce required fields to email only, and send the guide via a one-click email with a download link.
Case C: High bounce rate from Instagram. Desktop tests all looked fine, but in-app browser on older Android models stripped third-party cookies, breaking analytics. Fix: switch analytics to server-side events for critical conversions and reduce reliance on third-party cookies for attribution.
These are not edge cases. They are predictable. The thread that connects them is setup haste: using the wrong template, not checking webhook endpoints, or assuming in-app browser parity with standard mobile browsers.
Practical checklist to preserve attribution during a quick setup
Attribution is fragile when traffic comes from short-form platforms. You can set up a fast attribution-safe flow with three precautions:
Preserve UTM parameters across redirects and to the final form submission.
Record a session identifier in a first-party cookie or localStorage on page entry and attach it to the form submit.
Mirror critical conversion events to your analytics and to your payment provider via server-side calls where possible.
Even in a lean setup, maintaining one durable identifier per session preserves the ability to tie a conversion back to a specific post or story. Without it, optimization becomes guesswork.
FAQ
How strict does my 30-minute checklist need to be if I’m only promoting to a small audience?
For small audiences, strictness scales down. Prioritize clarity of offer, mobile tap targets, and ensuring the lead capture actually delivers the promise. Skip advanced analytics and complex checkout flows initially. However, don't skip a live test submission — even one successful form submit is worth the time because many failures are silent.
Can I rely on native platform tools (Instagram action buttons, TikTok storefronts) instead of a centralized link in bio?
Native tools are fine for some use cases but they fragment attribution and limit funnel logic. A centralized link—one URL you control—lets you attach simple funnel logic and capture repeat revenue across platforms. If you use native features too, still maintain a single canonical bio URL where you can route or mirror traffic.
If a payment fails during testing, how do I know whether it’s the provider or my setup?
First, run a test in sandbox mode provided by the payment processor and trigger the payment webhook logs. If sandbox claims succeed but production fails, examine differences: webhook endpoint, API keys, currency settings, or required merchant config (e.g., PDP or 3DS). Check email and webhook logs; they usually reveal whether the provider accepted the charge or rejected it due to configuration.
What minimal analytics do I need to monitor effectively after launch?
At minimum, capture page view, primary CTA click, form submit, and purchase events. Map these to UTM parameters or your session identifier. If you can only pick one, ensure form submit (or payment success) is recorded server-side so it isn't lost to browser-level blocking.
How do I keep iterative improvements from breaking the live flow later?
Use a simple change protocol: test every change with the 30-minute runbook, keep a short rollback note, and deploy incremental updates rather than sweeping template swaps. Preserve the same form field names when possible so integrations remain stable. If you need to swap a template, run a full test that includes a live transaction or a verified test email delivery.